How to access/use Twitter webhooks using Twitter-API-V2?


Twitter's API allows for a lot of capabilities, but webhooks are one of the most versatile and powerful. In this blog, we'll take a look at how webhooks work and how you can use them in your project.
Steps for creating a developer account and keys:
To get started with the Twitter API, you need a developer account. If you do not have one yet, you can sign up for one.
Next, in the developer portal create a new project and follow the steps to receive the API Key, API Secret Key and Bearer Token which we will use for our project.
Now set up your User authentication settings from the Twitter developer portal with the required information. Make sure to provide the callback URL as -
http://127.0.0.1:3000/callbackas we are going to run it locally and Twitter does not accept localhost as a valid URL.Now you may have a set of keys provided by Twitter:
API key(Consumer key),API key Secret(Consumer key secret),Bearer Token,Access Token,Access Token Secret,Client SecretandClient ID. I recommend regenerating them all once you have made all the changes in the developer portal as these keys change for different permissions required.We will be using the Twitter Account Activity API (free version) and to avail of it, you have to apply for elevated access in the developer portal which will grant you 15 subscriptions.
Now you are all set to start using Twitter webhooks.
Setting up 'ngrok' to tunnel your localhost:
ngrok is the fastest way to put your app on the internet. Test mobile apps against your development backend. Build webhook consumers and demo websites without deploying. ngrok lets you put your localhost app on the internet and receive requests on your localhost.
Sign up for ngrok and install its CLI and run :
ngrok http 3000
This command will tunnel your localhost:3000 to the internet and provide you with a URL to receive requests.
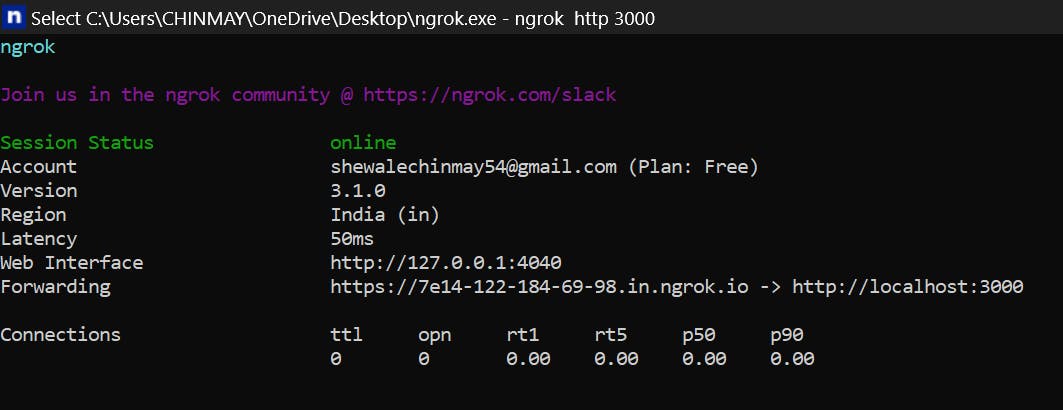
Here your URL is :-https://7e14-122-184-69-98.in.ngrok.io
You can even view the requests and payload received by viewing the http://127.0.0.1:4040/ (For me this was the port mentioned check if not working).
Webhook Configuration and subscription:
Webhook registration:
To register your webhook you can fork this account-activity-dashboard repository or even the endpoints specified by the Twitter documentation and run it locally following their steps and put the ngrok URL we received in the webhook URL.
Let's say:- https://7e14-122-184-69-98.in.ngrok.io then your webhook URL will be https://7e14-122-184-69-98.in.ngrok.io/webhook
Then Twitter will send a CRC request to this endpoint and we have to handle it.
Twitter Challenge-Response Check (CRC):
To verify that you are both the owner of the app and the webhook URL, Twitter will perform a Challenge-Response Check (CRC), meaning Twitter will make a GET request on the webhook URL and send a crc_token parameter. When that request is received, your web app needs to build an encrypted response_token based on the crc_token parameter and your app's Consumer Secret. The response_token must be encoded in JSON (see example below) and returned within three seconds.
const crypto = require('crypto');

app.get = ('/webhook',(req, res, next) => {

    var crc_token = req.query.crc_token;//crc token

    if (crc_token) {
        var hash = crypto.createHmac('sha256', process.env.CONSUMER_SECRET).update(crc_token).digest('base64');
        res.status(200);

        var response_token = 'sha256=' + hash;
        var json = {
            "response_token": response_token
        }

        res.json({
            "response_token": response_token
        })
    } else {
        res.status(400);
        res.send('Error: crc_token missing from request.')
    }

}
)
Once your webhook is established, Twitter will trigger a CRC roughly every 24 hours from the last time they received a successful response. When successful, a webhook id will be returned.
Adding subscription :
Subscription in simple words means the user for which you want to receive the webhook requests and Twitter allows up to 15 subscriptions.
You can subscribe a user by the previous Git repository we forked account-activity-dashboard.
For me, the subscription was not getting added through the website, So I used the scripts provided by them in their README.md and it worked for me.
If you receive an error of callback URL not registered or something like that try regenerating your tokens.
Receiving webhook requests:
Once you have successfully registered your webhook and added a subscription you will receive a post request on https://7e14-122-184-69-98.in.ngrok.io/webhook with a payload of data. You can check the various payloads and various event triggers HERE.
Now based on this payload you may execute various tasks and create your application. Make sure to send a response with status code 200 to Twitter.
Example request handler:
You may receive a JSON payload similar to this :
{
  for_user_id: '1606266324094955521',
  direct_message_events: [
    {
      type: 'message_create',
      id: '1609456288542646277',
      created_timestamp: '1672559256097',
      message_create: [Object]
    }
  ],
  users: {
    //Some user related data here
  }
}
So the message_create :[Object] contains all the data about who sent the message, what was the message, what URLs it contains and many more data and based on that we will now perform a console log operation:
exports.post = async (req, res, next) => {
    var body = req.body; //store the body of the request
    if (body.direct_message_events) {
        let senderId = body.direct_message_events[0].message_create.sender_id;//Twitter ID of the user who sent the message
        let message_data = body.direct_message_events[0].message_create.message_data.text;//storing the message text using json sent by twitter
        let urls = body.direct_message_events[0].message_create.message_data.entities.urls;//Url array with short url expanded url display url
        let hashtags = body.direct_message_events[0].message_create.message_data.entities.hashtags;//Array of all the hashtags and their indices in the text
        if (message_data == "Hello") {
            console.log("Hello World!");
        }
        if (urls.length) {
            console.log("URLs found in the message:" + urls);
        }
        if (hashtags.length) {
            console.log("Hashtags found in the message:" + hashtags);
        }
    }
}
So based on the events receive and the task you want to accomplish you may handle it accordingly.
Congratulations on successfully registering your Twitter webhook! With webhooks, you'll now be able to automate tasks and streamline your workflow like never before. You can now focus on creating great content while letting your webhooks handle the repetitive work. Keep experimenting with webhooks and discover new ways to optimize and enhance your Twitter experience. You're now part of an exclusive group of users who can take advantage of this powerful feature. Keep up the good work!
I hope I have covered all the steps to configure the webhook, If there is any mistake or any doubts you can contact me: chinma_yyy✌️